

Top 10 Essential Features of Sharp Copiers for Businesses
In today's fast-paced business world, efficiency and cost-effectiveness are paramount. Choosing the right printer or copier can significantly...
6 min read

Have you ever found yourself standing at the printer, sifting through piles of paper, frustrated that nothing’s in the correct order? You’re not alone! Printing large documents can sometimes feel like wrangling chaos, but it doesn’t have to. One simple trick can help you take back control and keep things tidy: the collate function.
Trust me, once you learn how to use this handy feature, your print jobs will always come out perfectly organized. Say goodbye to wasted time and hello to a smoother, more efficient office. Are you curious about how collating can save you from paper madness? Stick around, and we'll show you how.
When you're staring at your printer's settings, "collate" might seem like one of those confusing terms meant to trip you up. But fear not—collating is simpler than you think and can save you from a lot of hassle.
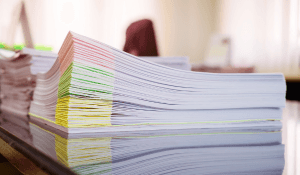
In plain terms, collating means organizing your printed pages in a specific order. Think of it like printing a booklet: collating ensures that each copy of your multi-page document comes out in the correct order—Page 1, Page 2, Page 3, and so on. Without collating, you'll end up with multiple sets of Page 1, then multiple sets of Page 2, which means you’d have to sort everything yourself manually. Not fun!
 Ever wonder if you should use the "collate" option when printing? Knowing when to collate can be the difference between a perfectly organized print job and a frustrating paper shuffle.
Here’s the deal: use collate when printing multi-page documents that require multiple copies. For example, if you're printing five copies of a 10-page report, collating will ensure that each copy is printed in the correct order—Page 1, Page 2, Page 3, and so on. Without collating, your printer will group all the Page 1s together, followed by all the Page 2s, meaning you’ll need to organize each set manually. That’s where things get messy.
Here’s when collating is essential:
On the flip side, when should you skip collating? If you’re printing a single-page flyer, handout, or document, or if you only need one copy of a multi-page document, collating isn’t necessary. In those cases, hit print, and you're done.
In short, collating is your go-to tool for keeping multi-page documents in perfect order. It saves you time, minimizes errors, and helps you deliver polished, organized print jobs every time.

Collating documents can save you time and effort, but how do you set it up? Don’t worry—we’ve got you covered with easy instructions for Sharp and Canon copiers and Lexmark printers. Whether in the office or managing a large print job, here's how to collate like a pro.
Following these simple steps, you'll master the art of collating, no matter which machine you use. Enjoy stress-free printing with perfectly organized documents every time!
 For businesses, time is money, and collating your print jobs is an easy way to save both. But there’s more to collating than just hitting a button. Here are a few simple hacks that can boost efficiency and reduce waste.
If your office regularly prints large, multi-page documents, like reports, proposals, or booklets, set your printer to collate automatically every time. This reduces the need for manual sorting and helps avoid mistakes. Modern printers and copiers allow you to set default preferences, so every job is collated without extra steps.
Before you hit print, try organizing your documents digitally. Many businesses waste paper by printing and then sorting drafts. Instead, use software like PDF editors or document processors to collate pages virtually. Only hit print when the document is final and ready to go.
Rather than running to the printer for every small job, batch your print jobs by department or task. This allows you to print larger sets at once, and using the collate function ensures everything is neatly ordered when you pick it up. This saves trips to the printer and reduces the chance of documents getting mixed up.
For businesses looking to be more eco-friendly, use duplex (double-sided) printing and collating. Not only does this save paper, but it also helps streamline lengthy print jobs, particularly for reports or manuals. Plus, fewer pages mean faster sorting and distribution.
If your business prints the same materials regularly—such as contracts, presentations, or training manuals—save the settings with collating already enabled. This way, your team can load and print the document without worrying about disorganization. It's a small hack, but it keeps everything running smoothly.
These simple collating hacks can significantly reduce wasted time and resources in your business, allowing your team to focus on what truly matters. A little preparation goes a long way, and with these tips, your print jobs will always come out perfectly organized and ready to go!
Collating your prints should make life easier, but if it’s not done correctly, it can lead to frustrating mistakes. Here are some common collating pitfalls and how to fix them to keep your print jobs running smoothly.
The Mistake: You’re in a hurry and forget to click the collate option. Suddenly, you have piles of Page 1s, Page 2s, and so on, leaving you to organize everything manually.
The Fix: Always double-check the collate setting before you print. It’s easy to overlook, especially when rushing. Set collating as your default for multi-page documents to avoid this issue altogether.
The Mistake: You accidentally collate single-page documents, resulting in unnecessary processing time and confusion.
The Fix: Remember, collating is only necessary for multi-page documents with multiple copies. If you’re printing single-page flyers or one-pagers, skip the collate option for a faster and more straightforward print job.
The Mistake: You’ve selected collate, but your printer isn’t responding correctly, and your documents still come out unorganized.
The Fix: Check your printer’s settings. Some printers have separate collate options for copying and printing, and the settings may need adjusting depending on the task. Also, ensure your printer's firmware is updated—outdated software can cause malfunctioning collate features.
The Mistake: Even with collating enabled, pages come out in the wrong order due to improper paper loading.
The Fix: Make sure the paper is loaded correctly in the tray. Double-check that the top of the document is aligned as indicated in the printer or copier's instructions. Select "reverse page order" in your print settings if pages come out in reverse order.
The Mistake: Printing a massive number of copies at once can overwhelm your printer and cause it to miscollate or jam.
The Fix: Break large print jobs into smaller batches. This reduces strain on your printer and ensures each batch is collated correctly. Not only does this prevent jams, but it also keeps your print jobs organized and easier to manage.
Collating might seem like a small detail, but it's a powerful tool that can significantly streamline your printing processes. Whether managing extensive reports, booklets, or multi-page documents, using the collate function ensures that everything comes out perfectly organized, saving you time and reducing costly errors. It not only boosts efficiency in your workflow but also minimizes waste, making it a smart choice for businesses looking to be more productive and eco-friendly.
By mastering collating, you're setting yourself up for smoother print jobs, fewer frustrations, and a greener office. It's a simple adjustment with a big payoff, and now that you know the ins and outs, you’re ready to tackle your next print job like a pro.
Looking to upgrade your copier or printer to one with collating functions? Fraser can help!
In today's fast-paced business world, efficiency and cost-effectiveness are paramount. Choosing the right printer or copier can significantly...
Saving trees is always a good thing, and there's no better message on this Arbor Day. In the office setting, there are many ways to reduce paper...
1 min read
You’ve decided it’s time for a new office printer. Regardless of the why, before you begin looking for your new printer, take time to consider your...